How to Replace a Finder Scope Bracket: Practical Setup Guide for 2026
Learn how to replace a finder scope bracket on your telescope with dovetail base sizing, secure alignment, and mounting advice for September 2026.
 By bsr_admin
Updated September 28, 2026
By bsr_admin
Updated September 28, 2026
Aligning a telescope with celestial targets demands a rigid, dependable aiming platform that maintains optical co-alignment throughout long observation sessions. When a factory plastic shoe cracks, threads strip under thumb pressure, or an observer needs to attach an electronic guide scope alongside an optical star pointer, learning how to replace a finder scope bracket becomes essential. Modern telescope optical tube assemblies rely on standard dovetail shoes and precision brackets to anchor everything from standard 6×30 or 8×50 finders to red dot reflex sights and green laser pointer rings. Upgrading to a machined aluminum bracket prevents flexure and wobble, ensuring your targeting aid stays aligned when moving across constellations.
Replacing these mounting shoes involves checking receiver hole spacing, matching screw thread profiles, and aligning the optical axis with the primary telescope barrel. Many astrophotographers transition to multi-slot brackets or dual-finder mounting bars to accommodate auto-guiding cameras without drilling new holes into fragile optical tube assemblies. Exploring guide scope setup basics highlights how a stable mounting platform keeps targeting accessories secure during long-exposure tracking. With the right hardware and a few basic precautions, swapping your telescope finder mount takes only minutes and delivers rock-solid aiming consistency under dark skies.
| Award | Product | BSP Score About BSP ScoreThe BSP Score is our own rating from 0 to 10, based on performance, design and build, ease of use, and value. It reflects independent research and is never influenced by manufacturers, retailers, or affiliate commissions. Learn more › | |
|---|---|---|---|
| Best Overall |
 Alstar Finder Scope Mount
|
9.2/10 | Buy |
| Best Premium |
 YUEOCT Telescope Mount Adapter Finder Scope
|
9.1/10 | Buy |
| Best Budget |
 Kqcibz 1 Piece Replacement Accessories for StarPal
|
8.9/10 | Buy |
 Astromania Finder Scope Dovetail Mount Plate
|
8.9/10 | Buy | |
 Bysameyee Universal Dovetail Base for Finder
|
8.6/10 | Buy | |
 SVBONY Dovetail Mount, Finder Scope Mount Bracket
|
8.6/10 | Buy | |
| Best Value |
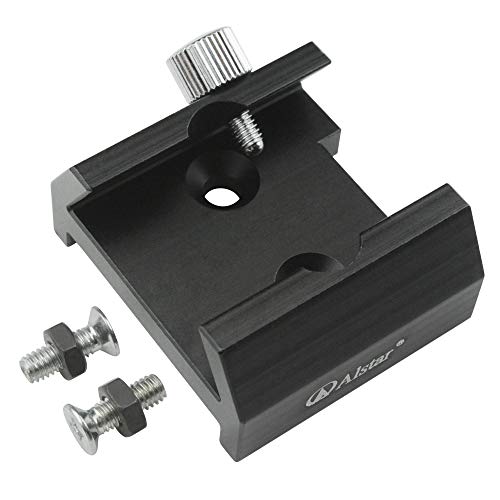 Alstar Dovetail Base, Finder Scope Mount Dovetail
|
8.6/10 | Buy |
 YUEOCT Camera Adapter Mount for Telescope Finder
|
8.6/10 | Buy | |
 Astromania Dovetail Finder Bracket for Finderscope
|
8.3/10 | Buy | |
|
Astromania Dovetail Finder Bracket for Finderscope
|
8.1/10 | Buy |
Replacing and Upgrading Telescope Finder Scope Brackets
Telescope targeting depends on a rigid connection between the optical tube assembly and the auxiliary sighting device. Replacing a broken or undersized finder shoe restores rapid star alignment and enables observers to mount heavier guide scopes, reflex sights, or secondary cameras. Understanding the mechanical interface between telescope tubes and replacement brackets ensures a secure installation that will not slip under field conditions. Investing a few minutes into selecting the right hardware transforms how quickly you locate faint celestial targets at night.
Understanding Telescope Finder Bracket Standards and Dovetail Geometries
Most modern commercial telescopes use a trapezoidal dovetail shoe design often described as the Synta or Vixen standard finder base. Brands like Sky-Watcher, Celestron, Orion, Vixen, and GSO widely employ this profile across refractors, reflectors, and Schmidt-Cassegrain optical tubes. The base features angled internal walls that capture a matching male dovetail foot attached to the finder scope stalk or ring assembly. Large thumbscrews clamp against the dovetail foot, holding the sight securely while permitting quick detachment during transport.
Differences arise in how these dovetail bases mount directly to the telescope body itself. Telescopes with cylindrical metal tubes, such as Newtonian reflectors and refractors, require a mounting base with a curved or cambered underside to match the outer tube radius. Installing a completely flat-bottomed base onto a round telescope tube creates point-load stress and allows the mount to pivot sideways under minimal pressure. Specialized brackets like the SVBONY Dovetail Mount feature a cambered bottom plate designed to seat flush against curved tubes, protecting the finish and maintaining mechanical rigidity.
Schmidt-Cassegrain telescopes feature distinct rear cell castings that use raised mounting bosses with specific screw spacings. Optical tubes such as the Celestron C8, C9.25, and C11 utilize factory-drilled holes that require precise center-to-center hole alignment. Products like the Alstar Dovetail Base specify center-to-center hole dimensions, such as 18.6 millimeters (0.76 inches), which must match the telescope casting holes. Slotted mounting shoes feature elongated transverse or axial slots, giving observers the flexibility to accommodate hole spacings between 10 millimeters and 30 millimeters.
Critical Pre-Installation Checks and Tube Safety Precautions
Safety during any optical tube modification requires protecting the delicate glass surfaces inside the telescope. Dropping a steel screw or an Allen wrench into the open aperture of a Newtonian reflector can chip or permanently scratch the primary mirror coating. Observers should rotate the telescope tube in its mounting rings until the finder mounting location faces upward or tilt the optical tube horizontally. Placing a soft microfiber towel or protective cardboard shield inside the tube directly beneath the screw holes prevents accidental drops from contacting optical glass.
Schmidt-Cassegrain and Maksutov-Cassegrain systems require extra caution regarding screw length because the rear cell contains the moving primary mirror mechanism and internal baffles. Threading mounting screws that are even two millimeters too long into an SCT rear cell can bind the focusing carriage or damage internal optical elements. Observers must measure the depth of the receiver holes and verify that replacement screws do not penetrate deeper into the casting than the factory original screws. Consulting the telescope manual or using plastic stop washers prevents fasteners from intruding past safe tolerances.
Refractor telescopes often utilize threaded mounting blocks integrated into the heavy focuser casting or exterior tube rings. Tube rings offer a very safe mounting alternative because the screws thread into the ring clamp rather than penetrating the optical tube wall. When modifying telescope hardware, ensuring the tripod and mount are locked solid prevents the assembly from swinging unexpectedly while applying torque. Incorporating proper leveling a telescope setup practices also keeps the optical tube stable on its mount during mechanical installations.
Essential Tools and Hardware Sizing for Dovetail Shoes
Replacing a telescope finder bracket requires a few common hand tools, primarily metric hex wrenches and precision screwdrivers. Most replacement dovetail shoes use metric fasteners, with M4 and M5 button-head or socket-head cap screws being the most prevalent sizes. Some heavy-duty plates, such as the Astromania Finder Scope Dovetail Mount Plate, incorporate multiple threaded through-holes including standard 1/4-20 threads and M8 x 1.25 threads for ring attachments. Checking whether the receiver holes in the telescope tube are drilled and tapped or require backing nuts is critical before beginning disassembly.
Telescope tubes made of rolled sheet steel often rely on tiny nuts positioned on the inside of the tube wall to secure the finder shoe. If the factory screws are backed out completely without holding the internal nut, the nut will drop directly into the tube interior. Using low-tack painter tape or mechanical tweezers to secure internal backing nuts prevents them from falling into the optical path. For telescopes with pre-threaded castings, no internal nuts are required, making hardware replacement a straightforward screw-in procedure.
High-quality replacement brackets are machined from solid aluminum alloy and finished with durable black anodizing to resist oxidation and outdoor moisture. Cast zinc or molded plastic brackets tend to crack when thumbscrews are tightened firmly, leading to loose aiming devices in the field. Upgrading to all-metal construction ensures that the clamp threads will not strip under regular use in cold nighttime temperatures. A rigid metal bracket also maintains alignment much better when moving the telescope between indoor storage and chilly observing fields.
Step-by-Step Guide: Removing the Old Bracket and Installing the New Mount
Begin the replacement by removing the existing optical finder scope, red dot sight, or laser bracket from its mounting shoe. Loosen the knurled thumbscrew on the side of the shoe until the finder foot slides freely out of the dovetail channel. Store the optical sighting device safely in an accessory case to prevent accidental drops or lens smudges while working on the telescope tube. Removing the optic first also eliminates excess weight and leverage while you loosen the base hardware.
Carefully loosen the mounting screws holding the old base to the optical tube assembly using the correct size driver. If the telescope uses internal nuts, reach inside the tube aperture or focuser opening with a small wrench or finger pressure to secure the nut before turning the screw. Set the old bracket and hardware aside, taking care to examine the thread pitch and length of the removed screws. Inspect the tube surface beneath the old base and wipe away any dust or grease using a clean lens cloth.
Position the new dovetail base over the mounting holes, ensuring the wide opening of the dovetail channel faces the rear of the telescope. Align the attachment holes or slots of the new bracket with the threaded holes in the tube wall or casting. Insert the mounting screws by hand first to avoid cross-threading the aluminum or steel threads. Tighten each screw evenly in an alternating pattern using moderate hand torque, securing the base firmly without bowing the telescope tube wall.
Slide the foot of your finder scope stalk or multi-bracket into the new dovetail shoe until it seats fully against the base stop. Hand-tighten the knurled thumbscrews firmly to lock the sighting device into position. Test the connection by gently wiggling the finder stalk to confirm there is zero play or wobble between the base and the tube. If the bracket shifts even slightly under light finger pressure, tighten the base fasteners further before proceeding.
Optical Axis Alignment: Calibrating the Finder Scope to the Main Telescope
Installing a new finder scope bracket alters the mechanical orientation of the sighting device, requiring a complete daytime alignment before nighttime observing. A telescope provides a very narrow field of view, making target acquisition impossible if the finder scope is pointed even one degree away from the main optical axis. Conducting this alignment during daylight hours on a distant terrestrial object eliminates the frustration of searching for celestial targets in the dark. Choose a distinctive target that remains completely stationary throughout the calibration process.
Point the main telescope at a prominent terrestrial landmark located at least a quarter-mile away, such as a distant utility pole insulator, antenna tip, or chimney top. Center the landmark precisely in the field of view of a medium-power or crosshair eyepiece in the main telescope focuser. Lock the mount clutches securely so the main telescope cannot move off the selected target. Double-check the eyepiece view after locking the clutches to ensure no mechanical shift occurred during tightening.
Look through the newly mounted finder scope or red dot reflex sight without disturbing the main telescope position. Adjust the alignment thumbscrews on the finder scope bracket until the crosshairs or red dot rest directly on the identical distant landmark. Switch to a higher-magnification eyepiece in the main telescope to re-verify center alignment, making micro-adjustments to the finder bracket screws as needed. Once both optical axes converge on the same point, tighten any locking rings or set screws to preserve the calibration for your stargazing session.
Multi-Device Mounting: Accommodating Guide Scopes, Red Dots, and Cameras
Modern amateur astronomy often requires multiple auxiliary devices mounted simultaneously on a single telescope tube. Astrophotographers frequently pair an optical finder scope for initial visual orientation with an electronic autoguiding scope for long-exposure tracking. Installing a triple mounting bracket, like the Alstar Finder Scope Mount, allows users to fit three separate Vixen-style aiming devices into a single receiver slot without drilling new holes into the optical tube. This approach provides immense setup versatility while preserving the original structural integrity of the telescope.
Dual-finder brackets, such as the Kqcibz Replacement Finderscope Bracket, offer a compact split arrangement that balances two targeting devices on either side of the primary optical tube. This configuration lets observers mount a wide-field red dot reflex sight on one side and a magnified 8×50 optical finder on the other. Red dot finders excel at quick manual pointing toward bright guide stars, while optical finders reveal dimmer deep-sky objects and star fields. Having both sighting options available eliminates the need to swap brackets during observing sessions.
Adapting standard camera equipment to telescope finder shoes has also become increasingly popular for wide-field astrophotography. Adapters like the YUEOCT Camera Adapter Mount feature a standard 1/4-20 mounting screw on top of a finder dovetail foot, allowing DSLRs or compact guide cameras to mount directly onto the telescope. Alternatively, coldshoe and hotshoe adapters, such as the YUEOCT Telescope Mount Adapter Finder Scope, enable observers to attach astronomy laser pointers or reflex sights equipped with camera-style flash feet. These hybrid adapters expand what amateur astronomers can achieve without requiring expensive custom machined hardware.
Troubleshooting Loose Bases, Hole Spacing Mismatches, and Alignment Limits
A common issue when replacing finder brackets is discovering that the screw holes on the new base do not match the spacing on the telescope tube. Telescope manufacturers do not adhere to a universal center-to-center hole distance, leading to variations between 12 millimeters and 35 millimeters across different brands. Choosing a base with an elongated central mounting channel, such as the Bysameyee Universal Dovetail Base, resolves this discrepancy by providing adjustable screw positioning. If a telescope tube lacks matching holes entirely, installing tube rings with integrated accessory shoes avoids drilling directly into the optical tube.
Another frequent mechanical problem is a finder scope that runs out of alignment screw travel before reaching optical convergence with the main telescope. This issue typically indicates that the replacement dovetail base is cocked at an angle due to an uneven tube surface or burrs around the screw holes. Loosen the base screws slightly and inspect the interface between the base plate and the tube surface. Placing a thin plastic or brass shim under the front or rear edge of the base corrects the mechanical tilt, restoring full adjustment range to the finder alignment screws.
Loose thumbscrews that back out during cold nights can cause expensive finder scopes to slip out of the shoe and fall. Inspect the clamping thumbscrew threads periodically and replace worn plastic-tipped screws with machined metal thumbscrews featuring knurled heads. Dual-thumbscrew bases provide enhanced security over single-screw designs, ensuring that the finder bracket remains clamped even if one screw loosens from thermal contraction. Checking the tightness of these thumbscrews should become part of your regular setup routine before darkness falls.
Key Mechanical Considerations When Selecting a Replacement Bracket
Selecting the correct replacement bracket requires evaluating the weight of the accessories you plan to mount. Lightweight red dot reflex sights require minimal clamping force, making standard single-slot dovetail bases perfectly adequate. Heavy 50mm or 60mm guide scopes equipped with sensitive CMOS guide cameras exert significant leverage on the mounting shoe during tracking maneuvers. For heavier optical payloads, choosing an extended dovetail bar with multiple mounting points, such as the Astromania Finder Scope Dovetail Mount Plate, distributes mechanical stress and eliminates flexure.
Cross-platform compatibility also extends to tactical Picatinny rails and red dot sights commonly used in outdoor sports. Specialty brackets, including the Astromania Dovetail Finder Bracket for Finderscope Reflex Sights, bridge this gap by accepting standard 21-millimeter Picatinny or Weaver rail clamps while fitting directly into standard Synta telescope shoes. This hybrid design allows observers to utilize rugged reflex sights originally designed for sporting platforms on their astronomical telescopes. Utilizing robust Picatinny clamps delivers repeatable zero retention when removing sights for storage.
Material quality remains the primary factor governing longevity and optical stability in telescope mounting hardware. Aluminum alloy brackets treated with anodized finishes resist scratching and withstand dew condensation without rusting. Avoiding low-grade cast metals or flexible plastic components guarantees that your finder scope retains its zero alignment across temperature swings and transport vibrations. High-grade metal construction ensures that your mounting platform remains rigid and dependable throughout years of observing.
Replacing a telescope finder scope bracket provides a straightforward way to restore targeting accuracy and expand your optical setup. Matching tube curvature, selecting proper fastener dimensions, and executing careful daytime alignment ensures your new bracket delivers dependable performance under dark skies. With rigid, precision-machined dovetail hardware installed, acquiring faint celestial objects and tracking long-exposure astrophotography targets becomes effortless and repeatable. Taking the time to seat every fastener securely gives you complete confidence each time you point your telescope toward the stars.
About the author

bsr_admin writes reviews and buying guides for BSP Review.