
How to Pick a Rifle Scope: Practical Guide for 2026
Learn how to pick a rifle scope with clear optical advice on magnification, reticles, and mounting systems in November 2026.
 By Tony Flanders
Updated October 20, 2026

Selecting the right optic determines whether a rifle delivers its full mechanical potential in the field or leaves a marksman struggling with poor sight pictures and shifting impacts. Understanding how to pick a rifle scope requires matching your shooting distance, ambient lighting conditions, and target profile to the mechanical and optical design of the sight. Whether you are hunting whitetail deer in dense timber or ringing distant steel targets across an open valley, your optic must balance glass clarity, repeatable turret tracking, and structural durability. Choosing poorly often leads to frustrating issues like dark sight pictures at maximum magnification, reticles that vanish against brush, or scope bodies damaged by improper installation.
Every shooting scenario introduces distinct technical demands on magnification range, objective lens diameter, and reticle focal plane configuration. A hunter tracking game at dawn requires generous light transmission and quick target acquisition, while a long-range competitor prioritizes precise milliradian or minute of angle graduations paired with reliable tracking. Exploring specialized setups like 50mm rifle scope options can highlight how objective bell geometry influences twilight brightness and overall clearance over the barrel. By weighing practical optical specifications against reliable mounting practices, any marksman can invest with complete confidence.
| Award | Product | BSP Score About BSP ScoreThe BSP Score is our own rating from 0 to 10, based on performance, design and build, ease of use, and value. It reflects independent research and is never influenced by manufacturers, retailers, or affiliate commissions. Learn more › | |
|---|---|---|---|
| Best Overall |
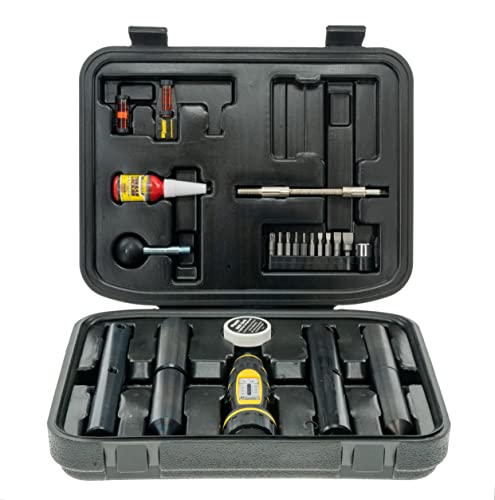
Wheeler Scope Mounting Combo Kit with FAT Wrench
|
9.1/10 | Buy |
| Best Value |
 CVLIFE 3-9x40 Rifle Scope |
8.8/10 | Buy |
Essential Principles for Selecting the Right Rifle Scope
Choosing an optical sighting system requires looking past basic brand marketing and evaluating the mechanical geometry inside the aluminum chassis. A rifle scope is a precision alignment tool containing delicate erector assemblies, multi-coated lens groups, and finely threaded adjustment screws. Balancing these elements against target distance, environmental conditions, and firearm recoil ensures that your rifle delivers reliable performance in every field scenario.
Magnification Range and Intended Engagement Distances
Magnification dictates both the apparent size of your target and the width of your field of view at a designated yardage. Low-power optics provide expansive scanning angles that let shooters track moving game or transition quickly across varied terrain without losing visual orientation. High-power magnification brings distant details into crisp focus, which helps identify target boundaries or read wind drift across distant foliage. However, excessive zoom restricts your field of view and magnifies natural shooter tremble, making off-hand shooting significantly more difficult.
For close to mid-range shooting, a traditional 3-9x magnification profile remains widely favored because it offers practical versatility across diverse field conditions. An optic like the CVLIFE 3-9×40 Rifle Scope illustrates this balance by providing 40.38 feet of field of view at 100 yards on 3x power for fast framing, while dialing to 9x power narrows the field to 13.41 feet for disciplined shot placement. Matching the zoom ratio to your typical hunting timber or target range prevents the common mistake of buying excess magnification that compromises practical speed.
Objective Lens Diameter, Exit Pupil, and Low-Light Transmission
The objective lens serves as the optical window that gathers ambient light and directs it into the scope tube toward the erector system. Optical brightness in twilight conditions is heavily governed by the exit pupil, calculated by dividing the objective lens diameter in millimeters by the selected magnification setting. The human eye pupil typically dilates between 5mm and 7mm in dim dawn or dusk environments, meaning that an optic producing an exit pupil within that bracket delivers maximum usable brightness to your retina.
A 40mm objective lens dialed to 4x magnification produces a generous 10mm exit pupil, providing bright target images even in heavily shaded timber. If that same 40mm scope is dialed to 9x power, the exit pupil contracts to approximately 4.44mm, which remains functional for twilight hunting while preserving a streamlined profile. Optical coatings play an equally critical role in image clarity, as fully multi-coated glass elements suppress internal reflections and increase overall light transmittance compared to untreated or single-coated surfaces.
Larger objective lenses, such as 50mm or 56mm models, admit more light at higher zoom settings but introduce mechanical trade-offs that every buyer must recognize. A wider objective bell requires taller mounting rings to maintain physical clearance above the rifle barrel, which frequently disrupts a natural cheek weld without an adjustable comb. Balancing objective size against rifle ergonomics prevents the rifle from feeling top-heavy while maintaining adequate clearance for standard bolt-action throws.
Focal Plane Architecture: First Focal Plane Versus Second Focal Plane
Understanding the physical placement of the reticle inside the optical assembly is critical when planning holdovers and range estimation. In a Second Focal Plane (SFP) configuration, the reticle is positioned behind the magnifying erector assembly, keeping the crosshairs the exact same visual size regardless of zoom setting. This architecture ensures that crosshairs remain bold and easily visible in low-light hunting timber even at minimum magnification, though subtension hashmarks are mathematically accurate at only one specific power setting, usually maximum zoom.
First Focal Plane (FFP) optics locate the reticle ahead of the erector assembly, causing the reticle grid to scale proportionally as magnification increases or decreases. This design allows angular measurements, trajectory holdovers, and moving target leads to remain mathematically true across every magnification level. Precision marksmen and target competitors often favor FFP designs for this reason, though hunters must be aware that FFP reticles can appear very fine and difficult to spot at low power against dark background brush.
Choosing between these two focal plane systems comes down to your primary shooting discipline and reliance on reticle holdovers. Shooters pursuing whitetail in heavy brush often prefer the predictable visibility of SFP reticles, while shooters engaging varied steel targets at unknown distances benefit from the dynamic scaling of FFP platforms. Evaluating how quickly you need to acquire targets versus how often you calculate ballistic drops guides this important choice.
Reticle Styles, Illumination Options, and Angular Measurements
Reticle designs range from simple, uncluttered duplex crosshairs to intricate grid architectures populated with windage and elevation hashmarks. A traditional duplex reticle uses heavy outer bars that draw the shooter eye toward a fine center crosshair, minimizing field distractions for conventional big game hunting inside ethical ranges. More advanced configurations, such as mil-dot reticles, incorporate standardized spacing along the stadia lines to assist with rapid distance estimation and precise bullet drop compensation.
Reticle illumination offers substantial advantages when hunting game against dense shadows, dark timber, or during legal dawn and dusk shooting windows. Some models feature adjustable brightness settings with dual illumination colors, allowing marksmen to switch between red illumination for low-light contrast and green illumination for bright daytime environments. The CVLIFE 3-9×40 Rifle Scope includes five brightness levels across green and red options, helping hunters preserve reticle contrast against dark targets without washing out target detail.
Matching your reticle units to your turret adjustments is vital for avoiding confusing mental conversions while shooting. Minute of Angle (MOA) systems adjust in increments based on circular degrees, where 1 MOA roughly equals 1.047 inches at 100 yards, with standard turrets moving in 1/4 MOA clicks. Milliradian (MRAD or Mil) systems operate on metric metric-friendly trigonometry, where 0.1 Mil equals 1 centimeter at 100 meters or 0.36 inches at 100 yards. Ensuring your reticle markings share the same angular language as your turret clicks prevents costly mathematical errors under field pressure.
Turret Configurations, Internal Travel, and Zero Stops
Turret mechanics control the internal erector tube that shifts your reticle position relative to the bore axis during sight-in and field adjustments. Capped turrets feature threaded protective aluminum covers that shield your adjustment dials from accidental bumps, mud, and brush during rigorous hunting treks. Many capped designs incorporate finger-adjustable reset dials, which allow shooters to sight in their rifle, loosen the cap mechanism, and re-index the indicator ring to zero for clean visual reference.
Exposed tactical turrets allow marksmen to dial elevation and windage solutions rapidly without removing protective hardware. These systems require crisp, tactile, and audible click detents so shooters can track their dial movement by feel without taking their eyes off the target. Dedicated target shooters using bench shooting rifle scopes prioritize internal erector tracking repeatability, ensuring that dialing up twenty clicks and returning down precisely twenty clicks brings the crosshairs back to exact zero.
Main tube diameter directly dictates the available internal elevation travel needed for dialing trajectory at extreme distances. A standard 1-inch main tube typically provides between 40 and 50 MOA of total internal travel, which is more than adequate for hunting out to several hundred yards. Opting for a 30mm or 34mm main tube expands internal erector travel significantly, allowing long-range competitors to dial substantial elevation corrections for distant targets without exhausting internal mechanical travel.
Eye Relief, Eyebox Forgiveness, and Ocular Diopter Adjustment
Eye relief measures the distance from the rear ocular lens to your pupil where a full, unvignetted sight picture is visible. Maintaining generous eye relief between 3.0 and 4.0 inches is a critical safety consideration on centerfire rifles to prevent painful ocular contact, commonly known as scope bite, during heavy recoil. The eyebox defines the lateral and axial latitude your eye can shift while maintaining a clear target view without black crescent shadows around the image perimeter.
A forgiving eyebox enables rapid target acquisition when mounting the rifle from awkward field positions, such as shooting off barricades or crouching against tree limbs. As magnification increases, the eyebox naturally tightens, requiring more precise head placement and consistent cheek weld along the rifle stock. Selecting an optic with balanced eye relief across its entire zoom range ensures consistent cheek placement regardless of power setting.
The fast-focus ocular diopter adjustment allows shooters to customize the optical focus of the reticle to match their individual eyesight. Adjusting the diopter correctly requires looking through the scope at a featureless background, such as an open daytime sky or a blank white wall, in quick two-second glances. Dialing the diopter ring until the reticle crosshairs appear instantly crisp prevents eye strain, ensuring that your vision does not fatigue while attempting to focus simultaneously on target and crosshair.
Parallax Adjustment Mechanisms and Focus Planes
Parallax occurs when the optical image of the target is not focused on the exact same internal focal plane as the reticle. When parallax is present, shifting your eye slightly off-center behind the ocular lens causes the reticle to appear to float or drift across the target, creating subtle aiming errors. Traditional hunting scopes designed for moderate ranges often feature a fixed parallax setting, usually calibrated at 100 or 150 yards, which provides adequate focus across common game engagement distances.
Higher-magnification scopes and precision competition optics incorporate adjustable parallax mechanisms, typically operated via a side-focus turret or an adjustable objective (AO) collar. These dials allow shooters to tune the focal plane precisely to match the exact yardage of the target, eliminating reticle swim entirely. In addition to eliminating parallax error, adjusting this dial sharpens the target image, bringing fine edge contrast into crisp focus across variable shooting distances.
Shooters engaging rimfire targets or small game at close ranges require parallax dials that adjust down to 25 yards or closer. Using a scope with a fixed 100-yard parallax at 25 yards often results in blurry target images and noticeable point-of-impact shift if cheek weld varies between shots. Confirming that your optic parallax range matches your anticipated shooting envelope prevents frustrating accuracy inconsistencies at both close and extended distances.
Proper Scope Mounting, Leveling, and Ring Torque Procedures
Even the finest optical glass cannot deliver consistent accuracy if the scope is improperly mounted to the rifle receiver. Reticle cant, where the vertical crosshair is not plumb with the rifle bore axis, introduces horizontal drift that magnifies with target distance. Using dedicated alignment tools, such as the Wheeler Scope Mounting Combo Kit with FAT Wrench, allows shooters to check ring concentricity and level the reticle using integrated bubble level systems to ensure consistent shot delivery.
Before installing your optic, always ensure the firearm is completely unloaded, the magazine is removed, and the chamber is visually inspected in a safe direction. Securing the rifle securely in a padded vise allows you to align base screws and verify mounting rail stability before resting the scope in the lower rings. When exploring heavy-duty hardware like long-range scope rings, maintaining even gaps on both sides of the ring caps ensures balanced clamping pressure around the aluminum tube.
Using a calibrated torque screwdriver, such as the Wheeler F.A.T. Wrench, protects delicate internal erector assemblies from severe mechanical damage. Over-torquing ring cap screws can crush the main tube or pinch internal erector springs, causing turrets to bind or track inconsistently. Always adhere strictly to manufacturer torque guidelines in inch-pounds, typically applying light cross-pattern tightening across ring caps to secure the optic without creating structural stress.
Field Durability, Environmental Sealing, and Maintenance
Field environments expose optical systems to rough transport, abrupt temperature swings, and driving precipitation. Modern quality rifle scopes are constructed from high-strength aluminum alloy bodies sealed with internal synthetic O-rings to prevent dust and water intrusion. Purging the internal tube with dry nitrogen or argon gas removes atmospheric moisture, preventing interior glass elements from fogging when transitioning from a warm vehicle into freezing mountain air.
Recoil resistance is another critical benchmark, particularly when pairing an optic with heavy centerfire calibers or high-recoil shotgun setups. Reliable scopes utilize durable erector coil springs designed to maintain internal tube tension under severe backward acceleration. Verifying that the manufacturer rates an optic for magnum shock ensures that your zero remains rock-solid through hundreds of rounds of regular field practice.
Preserving multi-coated optical surfaces requires disciplined lens cleaning practices to prevent abrasive scratching. Always remove loose dust and grit using a soft optical brush or bulb air blower before wiping lenses with clean microfiber cloth. Never use shirt tails, paper towels, or abrasive chemical cleaners, as these materials can permanently degrade anti-reflective lens coatings and reduce low-light contrast over time.
Evaluating your shooting distances, target size, and environmental lighting will lead you directly to the ideal optical configuration. Combining appropriate magnification and objective geometry with careful installation using calibrated torque tools gives your rifle system lasting precision. Taking time to select the right optical features ensures that every shot in the field breaks with total clarity and confidence.
About the author
Tony Flanders is an experienced astronomy writer and observer with a background in mathematics, technical research, and science communication. His extensive observing experience includes exploring deep-sky objects through different telescope configurations. He specializes in making complex astronomical concepts accessible to beginners and experienced observers alike.